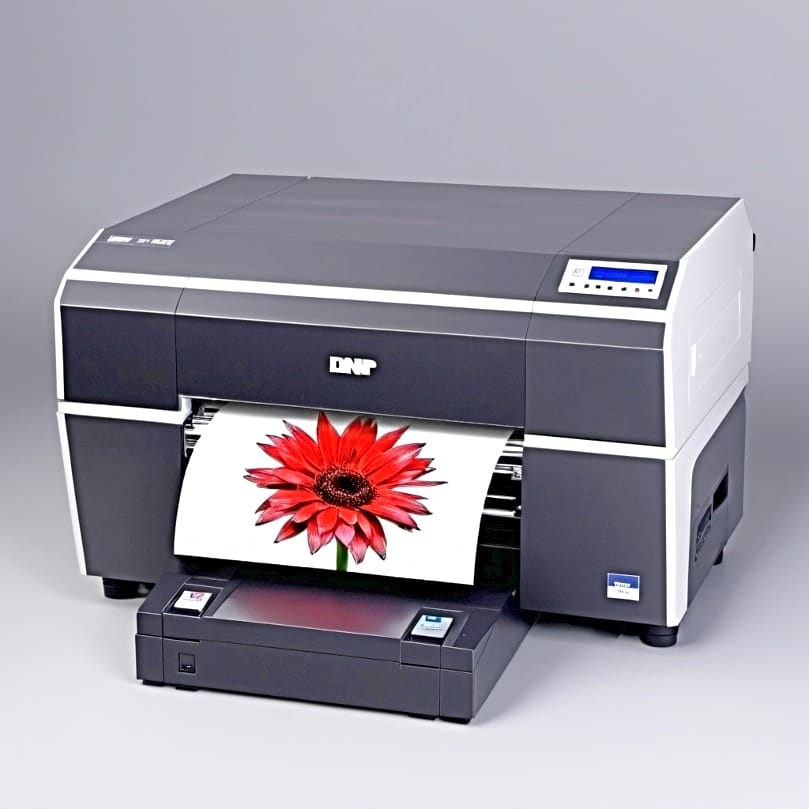
If you are looking to master your new DNP sublimation printer and start producing vibrant prints with immediate effect? In this detailed guide, we’ll walk you all the way through the process to setup and use DNP sublimation printers, from the initial unboxing to maintaining consistent print quality. Whether you’re setting up a DNP DP-QW410 or configuring your DNP DS620A, we’ve got you covered with clear instructions and practical tips. Join as we learn more about the DNP sublimation printer!
Key Takeaways
- Setting up a DNP DS620A printer is quick and user-friendly, involving the attachment of power supply cables, networking options, and a cable management system for an orderly setup.
- The DNP DS620A printer offers flexible printing options and finishes, supporting various photo print sizes and types, which can be further enhanced through adjustments in print settings and ICC Color Profile configuration for accurate color reproduction.
- Regular maintenance, including cleaning the thermal head and careful handling of media, is crucial for the DNP DS620A printer to ensure continued high-quality printing and to effectively troubleshoot common issues such as paper jams.[1]
Unboxing and Initial Setup
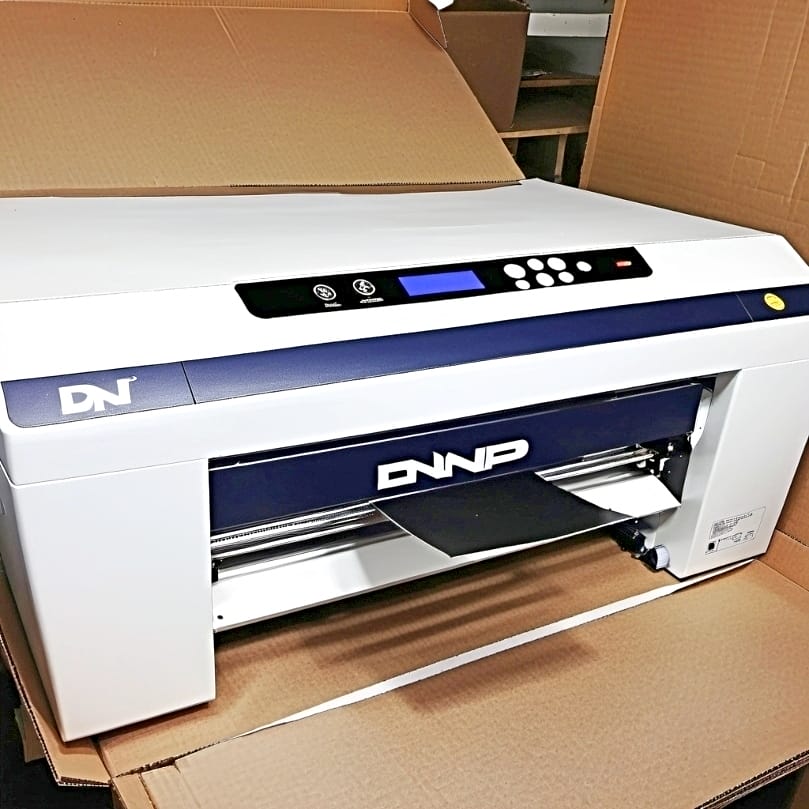
Imagine the excitement of unboxing your new DNP DP-QW410 printer. As you carefully open the box, you can feel the anticipation rising. And why wouldn’t it? After all, you’re about to unleash a world of effortless printing!
Setting up the printer is a breeze and can be completed in roughly ten minutes. This includes removing any packaging spacers and managing the ribbons.
What’s in the Box?
As you delve further into the box, you’ll find a set of accessories that facilitate setup and functionality. Among these is a Netgear Router that provides wireless connectivity, a feature that brings convenience to a whole new level.
You’ll also find side brackets that will assist in assembling the printer setup.
Connecting Your Printer
With the accessories at your disposal, it’s now time to connect your printer. Start by hooking up the power supply cables for the printer, router, and DS-Tmini terminal as part of the setup process. You’ll then use the supplied USB cable to connect the DNP DS620A printer to your computer, plugging the square side into the back of the printer.
⫸ Click Here For Best Selling Sublimation Printers And Products ⫷You’ve two options for network connectivity: using a wireless connect module or hooking the printer to a wired network through an Ethernet socket. Just remember not to plug the Ethernet cable into the yellow Internet port on the router.
Finally, to ensure a tidy setup and efficient power consumption, run the printer USB cable and AC power cord through a cable management system, if available, to reach the connecting device.
Installing the Print Media
With the setup of your DNP DS620A printer complete, let’s move on to installing the print media. This printer allows for the loading of both paper and ribbon, facilitating various print jobs.
But wait! Before you start loading, remember to utilize the centering adjustment feature on the printer. This ensures that your paper aligns correctly on the cut line, which is particularly important for precise strip printing.
Loading the Ribbon
Inserting the ribbon into your DNP DS620A printer is a straightforward process. You’ll start by opening the printer by lifting the bar at the bottom front and pulling the printer tray forward. Once the printer is open, you’ll remove the ink ribbon tray from inside the printer and place it on a flat surface.
Now comes the fun part – inserting the ink ribbon into the tray! Just align the spools into the correct slots, ensuring the ribbon runs along the top of the tray. When the ribbon is properly in place, you’ll reinsert the ink ribbon tray back into the printer, making sure it is securely in place.
Adding Paper
Adding paper to your DNP DS620A printer is as simple as loading the ribbon. But here’s the cool part: this printer model supports the creation of panoramic prints! That’s right, if you’re looking to create a panoramic effect, you’ll use 6×8 inch paper, which will be cut down after it has been printed.
Configuring Printer Settings
Now that your DNP DS620A printer is fully set up, let’s proceed to configure its settings. This is where you’ll modify a setting within the printer’s driver interface to switch between different finishes, such as:
- glossy
- luster
- fine matte
- matte
You’ll also be using an official ICC Color Profile. This is recommended for DNP printers to ensure that the colors in your prints are reproduced accurately, addressing issues such as wrong or faded colors.
And let’s not forget about the printer’s color conversion settings. These allow you to maintain original color information or opt to convert color images to grayscale as per your printing requirements.
Selecting Print Sizes and Types
One of the fantastic aspects of the DNP DS620A printer is its ability to support a wide range of print formats. Whether you’re looking to create:
- 2”x 6” photo booth fun strips
- 4”x 6” standard photo prints
- 5”x 7” photo prints
- 6”x 8” photo prints
- 6”x 20” panoramic photos
This printer has got you covered. You can adjust the printer settings to accommodate various print media sizes, and it even has the functionality to automatically cut the roll at the end of a photo for sizes like 4×6, 5×7, and 6×8 inches.
Adjusting for Optimum Performance
To optimize print quality and speed, you’ll want to select the highest dpi setting on your DNP DS620A printer, such as 600 dpi. This results in sharper and more vibrant prints, which is preferred for achieving the best image quality.
And speaking of speed, did you know that this printer can achieve the fastest print speeds, with a single 4×6 photo taking as little as 12 seconds? And when printing 10 copies, it can go as low as 8.6 seconds per photo, in its high speed mode, showcasing impressive image throughput and print speed – that’s less than nine seconds per photo!
Navigating the Printing Software
Now that we’ve covered the hardware, let’s move on to the software. The DNP printer drivers and software can be downloaded from the official DNP website, ensuring compatibility with various versions of Windows systems.
To rectify issues with prints that seem darker or redder, you need to establish appropriate color management in the printer driver, ensuring accurate color reproduction and image sharpness with full vibrant colors.
Software Installation and Setup
To achieve accurate color reproduction on your DNP DS620A printer, follow these steps:
- Download the correct ICC Color Profile from DNP’s official resources.
- Install the ICC Color Profile on your computer.
- Configure your printer settings to use the installed ICC Color Profile.
- Print a test image to verify the color accuracy.
This process may sound a bit complex, but don’t worry, the steps are straightforward, and the results are definitely worth it!
Creating Custom Templates
The ability to create custom print jobs is one of the many features that make DNP printers, especially their flagship model, stand out. By accessing the DNP support page, you can find various templates for download. DNP even offers a range of Photoshop templates tailored to specific events like Baby Announcements and Graduation ceremonies.
To download your desired template, all you have to do is fill out a form on the DNP website.
Printing Your First Photograph
Now that your DNP DS620A printer is fully set up and ready for action, the moment you’ve been waiting for has arrived – printing your first photograph! But before you hit print, remember to select your image size accordingly for optimal print quality.
Preparing Your Image
Image preparation is equally important as setting up your printer. To minimize cropping and ensure compatibility with various print sizes, you should edit your images to have common aspect ratios such as 11:15. Sharpening is another necessary step for every photo, with the degree of sharpening varying depending on the print size and medium.
And remember, your digital images should be exported as high-quality JPEG files, with a recommended export quality of at least 85 percent in Adobe Lightroom or a level of 10 in Adobe Photoshop.
The Printing Process
At last, the long-anticipated moment is here – the printing process! Dye-sublimation printing transfers vibrant colors from a ribbon onto the paper using heat. This process is commonly used for creating high-quality photographic prints. Understanding this essential mechanism will provide you with a greater appreciation for the process and the stunning prints it produces.
Maintenance and Troubleshooting
Regular maintenance is key to ensuring your DNP printer continues to produce high-quality prints. Performing regular cleanings of both the printer’s exterior and interior as part of standard maintenance can prevent dust accumulation and ensure consistent print quality over time.
Routine Maintenance
Cleaning the thermal head with a cleaning stick is an integral part of the routine maintenance for DNP printers. This helps remove residue that can affect print quality.
If you’re planning to transport your printer, don’t forget to remove the media to avoid potential internal damage.
Solving Common Problems
Despite regular maintenance, you might still come across some issues with your DNP printer. If you ever experience a paper jam, follow these steps:
- Remove the ribbon cassette.
- Carefully remove the jammed paper without applying excessive force.
- After clearing a paper jam, cut away problematic sections of the paper, such as wrinkled or partially printed areas, before resetting the media.
You can also learn how the steps for set up and use of a Mitsubishi sublimation printer, and the steps for use and set up of a Mimaki sublimation printer.
Summary
Congratulations! You’ve now embarked on a journey towards effortless printing with DNP Sublimation Printers. From unboxing your printer to printing your first photograph, you are now equipped with the knowledge to produce high-quality prints right from your home or office. Remember, the key to achieving stunning prints lies not just in the printer itself, but in the careful setup, maintenance, and understanding of the printing process. Don’t miss my related guide on removing sublimation ink from a printer!
Frequently Asked Questions
How do I connect my DNP printer to my computer?
To connect your DNP printer to your computer, use the printer’s USB cable to connect it to the WPS-1 device via the USB-1 port. If you have two printers, connect the second one to the USB-2 port after connecting the first one. Then, plug in the WPS-1 power cable.
How many watts does a DNP printer use?
A DNP printer uses around 3.0-3.4W while on standby and 5.0-5.4W when printing, making it an energy-efficient option for printing needs.
What is the price of DNP printer in India?
The price of the DNP printer in India is approximately Rs 51794 to Rs 56000, depending on the model and location.
How to switch between glossy, luster, fine matte, and matte finishes on the DNP DS620A printer?
To switch between glossy, luster, fine matte, and matte finishes on the DNP DS620A printer, modify the setting within the printer’s driver interface.
How to download and install the correct ICC Color Profile?
You can download and install the correct ICC color profile from DNP’s official resources.
References
- Printers. (n.d.). https://dnpphoto.com/en-us/Products/Printers