A sublimation test print validates color accuracy and print quality before committing expensive substrates. Color charts reveal drift and banding issues early. Your ICC profile controls how test colors convert from screen to paper, while color calibration ensures accuracy before pressing. Understanding how your ICC profile affects test results connects to color-control principles explained in our sublimation color management guide.
Key Takeaways
- Delta E values quantify deviation between expected and actual test print colors, showing calibration accuracy numerically.Delta E is a standardized metric used in color science to quantify visible differences between expected and printed colors objectively.[1]
- CIELAB measurements evaluate test-print color accuracy using device-independent values for objective comparison across systems.
- Regular test printing catches nozzle clogs, color shifts, and density problems before they waste materials on final prints.
What Is a Sublimation Test Print and Why Does It Exist?

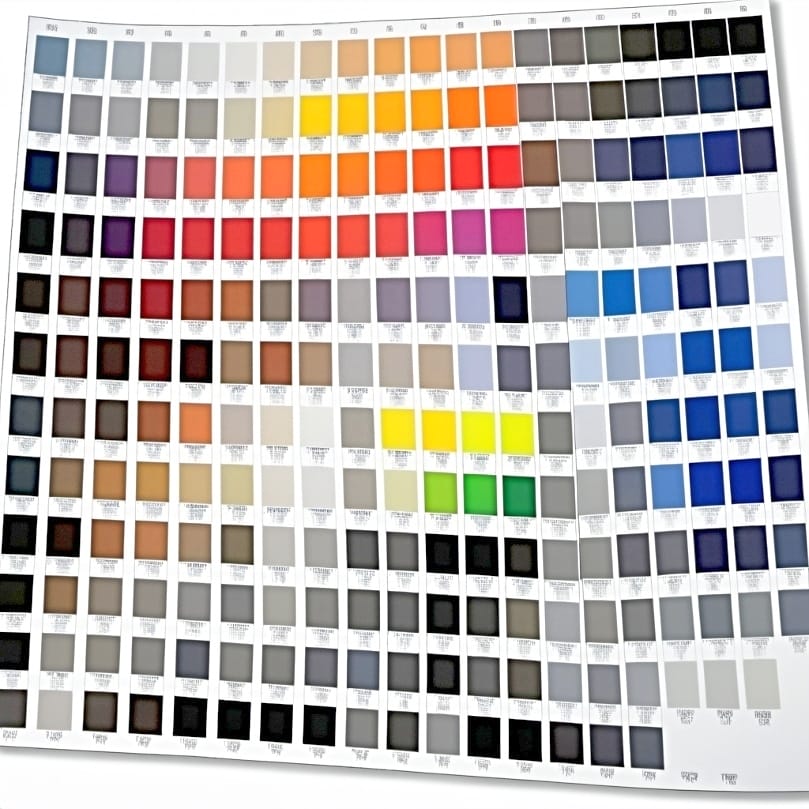
A sublimation test print is a diagnostic page containing color charts, gradients, and alignment patterns that reveal problems before final production. Color charts expose banding, hue shifts, and nozzle failures across the spectrum. Viewing conditions affect how test colors visually appear—evaluate prints under consistent lighting. Standardized viewing conditions affect perceived print quality, which our guide on best picture quality for sublimation explains. Consistent viewing conditions are essential for reliable color evaluation, as lighting variations can alter perceived brightness and color accuracy.[2]
What Is a Sublimation Test?
A sublimation test evaluates printer output quality by printing standardized patterns that expose potential problems. Your ICC profile ensures consistency of color conversion during testing, translating design colors to printer output predictably. Test prints check nozzle function, color accuracy, alignment, and overall system health before production.
What Does a Test Print Reveal Before You Print a Full Design?
Test prints reveal multiple potential issues before wasting materials on full designs. Print density problems show whether the printer deposits sufficient dye for proper darkness. Saturation issues indicate whether intense colors degrade in output. Streaks, banding, missing colors, and alignment errors all become visible on diagnostic patterns.
Why Are Test Prints Important Before Sublimation Transfers?
Test prints prevent costly mistakes by detecting problems before pressing onto expensive blanks. Color calibration helps identify misalignment between expected and actual output before wasting substrates. Soft proofing predicts test-print results on-screen, but physical tests confirm actual printer behavior. Catching issues early saves both materials and time.
Why Is Test Printing Important?
Test printing identifies problems when they cost only paper and ink rather than finished blanks. Delta E measurements quantify accuracy between expected and actual prints numerically, revealing whether calibration meets acceptable tolerances. Regular testing maintains consistent quality across production runs.
⫸ Click Here For Best Selling Sublimation Printers And Products ⫷What Does a Test Print Do?
A test print provides objective data about printer performance at a specific moment. CIELAB values measure color lightness, saturation, and hue independently of devices. Comparing test results against targets reveals whether hue shifts appear before committing to final prints on expensive substrates.
What Flaws Do People Check for During a Sublimation Test Print?

Common test print flaws include banding, streaking, missing colors, and density problems. Gamut limitations show as clipped or missing colors in saturated regions. Dithering patterns reveal banding issues in gradients where smooth transitions should appear. Evaluating print density helps diagnose both darkness and quality problems, which our guide on making sublimation darker covers.
What Should You Look for in a Test Print?
Examine test prints for specific indicators of printer health. Print density variations reveal light areas indicating clogged nozzles or low ink. Color chart sections make flaws clearer across different hues—missing colors indicate specific channel problems. Check alignment patterns for registration accuracy and gradient sections for smooth transitions.
How Do You Run a Sublimation Test Print Step-by-Step?

- Verify color calibration settings match your current ink and paper combination. Calibration ensures the printer is synchronized for accurate test results.
- Load sublimation paper correctly with printable coating facing up. Wrong paper orientation causes blank or faded test prints.
- Select or create a comprehensive test pattern with color bars and gradients. Good test patterns include all primary colors, gradients, and alignment markers.
- Confirm correct ICC profile is selected for your printer and media. ICC profiles ensure correct translation from design file to printed output.
- Print at highest quality settings to evaluate maximum printer capability. Quality settings affect density and detail; test at production settings.
- Allow print to dry completely before evaluation to prevent smearing. Wet ink can distort colors and create false flaw indications.
- Examine under consistent, neutral lighting for accurate assessment. Variable lighting affects color perception and can mask problems.
- Document results and compare against previous tests for trend tracking. Proper color calibration tools help create accurate test-print workflows, which our sublimation tools guide reviews.
How Often Should You Run a Printer Test Print to Avoid Problems?

Run test prints at minimum monthly or whenever you notice quality changes. Print density consistency requires regular monitoring to catch gradual degradation before it affects production. Viewing conditions should remain constant between tests for valid comparisons. More frequent testing benefits high-volume operations where catching problems early saves significant material costs.
How Often Should Test Prints Be Done for Consistent Sublimation Results?
Consistency requires testing before each production run, after ink refills, following extended idle periods, and whenever environmental conditions change significantly. Track Delta E values over time to establish when recalibration becomes necessary. Increasing deviation indicates developing problems requiring attention before quality degrades visibly.
Ready to Run Your Sublimation Test Print with Confidence?
Implementing regular test printing establishes quality baselines and catches problems early. Soft proofing ensures realistic expectations before physical testing, while CIELAB measurements help interpret test-print accuracy objectively. Start with standardized test patterns, maintain consistent evaluation conditions, and track results over time for reliable sublimation quality control.
Frequently Asked Questions
Can line gaps or streaks show up even if ink levels look fine beforehand?
Streaks and line gaps can appear despite adequate ink levels because clogged nozzles block ink delivery regardless of tank volume. Dried ink in printhead channels causes intermittent firing or complete blockage. Print density suffers in affected areas even when cartridges show full. Regular cleaning cycles prevent buildup.
Do faint test prints always mean a transfer will look light too?
Faint test prints usually indicate transfer problems, though not always proportionally. Print density issues on paper typically transfer to substrate with similar reduction. However, proper pressing technique can maximize transfer efficiency. Saturation that appears weak on paper may still produce acceptable results if the issue is paper absorption rather than ink output.
Can humidity or storage conditions impact test print sharpness?
Environmental conditions significantly affect test print quality. High humidity causes paper to absorb moisture, leading to ink spread and reduced sharpness. Improperly stored paper curls or develops coating degradation affecting ink adhesion. Temperature extremes alter ink viscosity, impacting print density. Store materials in controlled environments for consistent test results.
Can horizontal streaks and vertical streaks come from different root causes?
Horizontal and vertical streaks often indicate different mechanical problems. Horizontal banding typically results from printhead alignment issues or inconsistent paper feed movement. Vertical streaks usually indicate clogged nozzles in specific color channels. Hue shifts accompany channel-specific clogs—missing cyan creates warm color cast while missing magenta shifts output green.
Is a test print trustworthy on all colors or does blue fail differently?
Different colors can fail independently because each relies on specific ink channels. Blue requires both cyan and magenta functioning correctly—either channel failing produces different color shifts. Saturation problems may affect some hues more than others depending on ink formulation. Test patterns should include all primary and secondary colors for complete evaluation..
References
- Hajim School of Engineering & Applied Sciences : University of Rochester. https://hajim.rochester.edu/ece/sites/gsharma/papers/CIEDE2000CRNAFeb05.pdf
- PDF/A-1b, PDF for long-term preservation, use of PDF 1.4, level B conformance. (2019, January 5). Library of Congress. https://www.loc.gov/preservation/digital/formats/fdd/fdd000252.shtml
www.ginnimedia.com/about-us/what-we-do
⫸ Click Here For Best Selling Sublimation Printers And Products ⫷